# Pie Recipes
Pie recipes for Allen, including the ingredients needed and instructions.
# Apple Pies
Apple pie recipes.
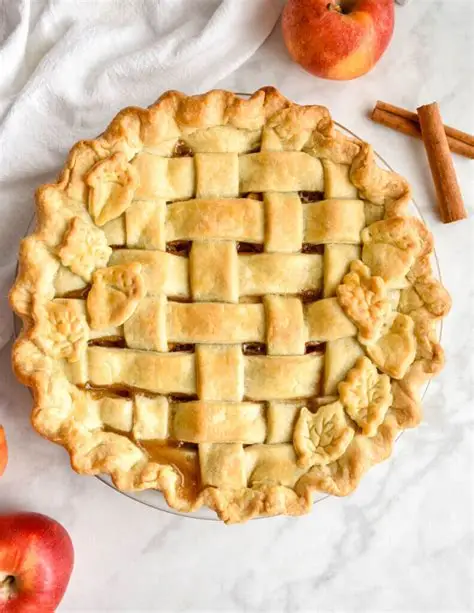
# Old-Fashioned Apple Pie
This classic and traditional American apple pie recipe is time-tested and truly delicious! Use tart, firm apples that will hold up to baking.
[![image[1].webp](https://wiki.brandonon.ca/uploads/images/gallery/2026-04/scaled-1680-/image1.webp)](https://wiki.brandonon.ca/uploads/images/gallery/2026-04/image1.webp)
## Ingredients
- 1(14.1 ounce) packagepastry for a double-crust 9-inch pie
- 7cupspeeled, cored and sliced apples
- 1cupwhite sugar
- 3tablespoonsall-purpose flour
- 1teaspoonground cinnamon
- ¼teaspoonsalt
- ⅛teaspoonground nutmeg
- 2tablespoonsbutter
## Directions
1. Preheat the oven to 425 degrees F (220 degrees C). Line a 9-inch pie plate with bottom crust.
2. Combine apples, sugar, flour, cinnamon, salt, and nutmeg in a bowl. Place mixture into the prepared pie plate. Dot with butter. Cover with top crust and seal. Cut holes in top crust to allow venting.
3. Bake in the preheated oven for 10 minutes.
4. Reduce the oven temperature to 300 degrees F (150 degrees C) and bake until crust is golden brown and apples are tender, 40 for 50 minutes. Cool and serve.
## Nutrition Facts
Calories402
Total Carbohydrate 61g
Dietary Fiber 3g
Total Sugars 35g
Protein 2g
Total Fat 17g
Saturated Fat 4g
Cholesterol 8mg
Vitamin C 4mg
Sodium 374mg
Calcium 19mg
Iron 0mg
Potassium 155mg
# The BEST Apple Pie Recipe
## Ingredients for Apple Pie
- #### **Pie crust** – you’ll need two disks of [homemade pie crust](https://wiki.brandonon.ca/books/pie-recipes/page/pie-crust-recipe). We love this apple pie crust just as much as the filling. Since it’s an all-butter homemade pie crust (no shortening), it’s flaky and tender. The bottom is never soggy but forms a crispness at the edges. You can use store-bought, but homemade is best.
- #### **Apples** – We use Granny Smith in this pie recipe for the best flavor and texture. Avoid overripe or mushy apples. See my notes on apple substitutions below.
- #### **Butter** **& Flour** – creates a thick and saucy filling
- #### **Cinnamon** – adds a warm, spiced flavor to the apples. You could also add a pinch of nutmeg.
- #### **Sugar** – add sugar to taste, depending on the types of apples used (see apple options below).
- #### **Egg Wash** – combining egg and water gives the crust a golden brown, shiny finish.

## The Best Apples for Apple Pie
#### **Granny Smith apples** are tart and crisp and the gold standard for baking, but any sweet/tart and crisp apples or even a mix of apples will do, but use less sugar when substituting sweeter apples such as Golden Delicious, Jonagold, Honeycrisp, Fuji, Braeburn, or Pink Lady.
## How to Make Apple Pie
- #### **Prepare the** [pie crust recipe](https://wiki.brandonon.ca/books/pie-recipes/page/pie-crust-recipe) and chill in the refrigerator. When ready to assemble your pie, preheat the oven to 425˚F with a rack in the center of the oven.
- #### **Make the Filling** – Melt butter in a medium saucepan over medium heat, add flour and whisk constantly for 1 minute. Whisk in water and sugar. Simmer for 3 minutes, then remove from heat. Do not overcook.
- #### **Prepare apples** – peel, core, and slice apples into about 1/4″ thick slices. Sprinkle with cinnamon and toss to combine, then stir in the filling to coat the apples.The Best Tool for Apple Recipes
4. #### **Roll the Crust** – into a 12-inch diameter pie dough and transfer to a 9-inch, deep pie pan. Add the apple filling, mounding in the center (avoid getting apple filling on the edges of the pie crust, which will make it difficult to seal).
5. #### **Lattice Top –** Roll the second disk into an 11-inch diameter circle and cut into 10 strips with a pizza cutter. Arrange half of the strips over the pie and weave in the second layer of strips. Crimp the edges to seal and brush the crust with egg wash.
6. #### **Bake** at 425˚F for 15 minutes, then reduce the heat to 350˚F and continue baking for another 45 minutes until you see thick juices bubbling through the lattice crust for at least 5 minutes.

## How to Keep Pie From Browning Too Fast
#### If you find the edges of your pie are browning too quickly, you can use a pie shield or simply cut a 3″ circle out of the center of a square sheet of foil and loosely place it with the dull side down over the top of your pie.
## Tips for the Best Apple Pie
- #### **Don’t overheat the filling –** Avoid overheating the sauce or cooking for too long, which can cause it to separate or get too thick. If this happens, don’t stress, you can still toss the apples together with the sauce, and it will come together in the oven.
- #### **Chill the crust** – make sure to chill the pie crust according to the instructions, or the butter will melt out of the crust, and it will go flat.
- #### **Let it cool** – allow the pie to cool and set for at least an hour before slicing, for the juices to thicken up and set, otherwise it will slide apart when sliced.

# Copilot's Classic Apple Pie Recipe
# Classic Apple Pie
[](https://wiki.brandonon.ca/uploads/images/gallery/2026-04/GWNimage.png)
### For the crust
- 2 1/2 cups all-purpose flour
- 1 tsp salt
- 1 tbsp granulated sugar
- 1 cup (2 sticks) cold unsalted butter, cubed
- 6–8 tbsp ice water
### For the filling
- 6–7 medium apples (Granny Smith + Honeycrisp mix), peeled, cored, and sliced
- 3/4 cup granulated sugar
- 1/4 cup brown sugar, packed
- 2 tbsp all-purpose flour
- 1 1/2 tsp ground cinnamon
- 1/4 tsp ground nutmeg
- 1/4 tsp salt
- 1 tbsp lemon juice
- 2 tbsp unsalted butter, cut into small pieces
### For the egg wash
- 1 egg
- 1 tbsp milk or cream
- 1–2 tsp coarse sugar (optional, for sprinkling)
## Instructions
### Make the crust
1. In a large bowl, whisk together the flour, salt, and sugar.
2. Add the cold butter cubes and cut them into the flour with a pastry cutter or your fingers until the mixture resembles coarse crumbs with pea‑sized bits of butter.
3. Sprinkle in the ice water, 1–2 tablespoons at a time, tossing gently until the dough just comes together when pressed.
4. Divide the dough into two discs, wrap each in plastic wrap, and chill for at least 1 hour.
### Prepare the filling
1. In a large bowl, combine the sliced apples, granulated sugar, brown sugar, flour, cinnamon, nutmeg, salt, and lemon juice.
2. Toss until the apples are evenly coated. Let sit for 10–15 minutes while you roll out the dough.
### Assemble the pie
1. Preheat the oven to 425°F (220°C). Place a rack in the lower third of the oven.
2. On a lightly floured surface, roll out one disc of dough into a circle about 12 inches in diameter.
3. Fit the dough into a 9‑inch pie dish, letting the excess hang over the edges.
4. Fill the crust with the apple mixture, mounding slightly in the center. Dot the top with the 2 tablespoons of butter.
5. Roll out the second disc of dough into another 12‑inch circle. Place it over the apples.
6. Trim excess dough, leaving about 1/2 inch overhang. Fold the top and bottom crusts together and crimp the edges.
7. Cut a few slits in the top crust (or create a lattice) to allow steam to escape.
### Bake
1. In a small bowl, whisk together the egg and milk. Brush the top crust with the egg wash and sprinkle with coarse sugar if using.
2. Bake at 425°F (220°C) for 20 minutes.
3. Reduce the oven temperature to 375°F (190°C), cover the edges with foil if browning too quickly, and bake for another 30–35 minutes, or until the crust is golden and the filling is bubbling.
4. Let the pie cool on a wire rack for at least 2 hours before slicing to allow the filling to set.
## Serving suggestion
Serve warm or at room temperature with vanilla ice cream or whipped cream.
# Pie Crusts
Recipes for pie crusts.
# Pie Crust Recipe
## Homemade Pie Crust
#### This pie dough recipe yields 2 single crusts or 1 double pie crust. Homemade pies are irresistibly delicious, and you can always tell when a pie is homemade by the crust. I’ve never been satisfied with a store-bought pie the same way. An all-butter pie crust has a melt-in-your-mouth buttery taste and delicate texture. An Aple Pie or Cherry Pie that is made completely from scratch can’t be beat!
#### Knowing that I made the pie dough always makes me feel like a real ‘Martha Stewart’ (or should I say ‘Natasha’s Kitchen’… I couldn’t resist)! Watch my detailed VIDEO tutorial below, and you will be cranking out those homemade pie crusts in no time.
#### P.S. They also keep really well in the refrigerator and freezer if you want to get ahead on your holiday Chicken Pot Pie or Dutch Apple Pie. I always love having pie dough on hand for easy homemade pies (see make-ahead instructions below).
## Ingredients for Pie Dough
#### It doesn’t get any easier than this pie dough, and you probably already have everything you need for a homemade pie crust: all-purpose flour, sugar, salt, unsalted butter, and water.
#### **The butter should be COLD**, straight from the fridge so you don’t have to plan ahead to make pie dough. Also avoid handling the butter too much which can soften it. You can pre-dice the butter and put it back in the refrigerator to keep it chilled until needed.
## How to Make Pie Dough in 4 Easy Steps
#### This process is super easy in a food processor but you can also use a pastry blender (see instructions below).
- #### Measure flour correctly then in a food processor, pulse together flour, sugar and salt.
- #### Add COLD diced butter and pulse until coarse crumbs and some pea-sized pieces form.
- #### Add 7 Tbsp ice water and pulse just until moist clumps/ small balls of dough form. Pinch a piece of dough between your fingers, and if it sticks together, it’s done. If your dough is too crumbly, add more ice water, 1 tsp at a time. Be careful not to add too much water, or the dough will be sticky and difficult to roll out.
4. #### Transfer the dough to a clean work surface and gather together into a ball. Resist the urge to knead the dough and avoid overmixing. Fold/knead the dough over itself just enough for it to hold together. You should still see crumbles or pockets of butter in the dough, which create a flaky dough after it’s baked. The dough should not be smooth. Divide the dough in half and flatten into 2 disks. Cover with plastic wrap and refrigerate for 1 hour before using.
## Can I use a Pastry Cutter Instead?
#### You can use a pastry cutter to cut the butter into the flour/sugar/salt mixture by hand. You can also use 2 forks, but in my opinion, forks make the process slow and annoying, while a pastry cutter or food processor makes the process much easier.
#### **To use a Pastry Cutter:** Whisk together the dry ingredients ina a mixing bowl and whisk to combine. Add diced cold butter and lightly toss to coat in flour. Use the pastry cutter to cut the butter into the flour until the mixture looks like a coarse meal with pea-sized butter crumbles. Add the ice water, 1 Tbsp at a time, and stir it in with a firm spatula with each addition. Stop adding water when you see large clumps forming.
## How to Make a Pie Crust
#### Once your dough is chilled, you can roll and form your pie crust.
- #### Dust work surface with flour and roll a single crust into a 12″ circle. Wrap your pie dough around your rolling pin. If it sticks to the work surface, use a food scraper or spatula to loosen it as you go.
- #### Carefully transfer crust to 9″ pie dish and unroll it into the pan. Gently press the dough down to line the pie dish. Tuck excess dough underneath itself to make a thick double-layered edge (no waste!).
## How to Crimp and Flute Pie Crust
##### To form a fluted pie rim, hold your thumb and index finger an inch apart on the outside edge of the crust and press between them with the index finger of the other hand. Move around the edges of the pan repeating the motion to create a fluted rim. If you want to get creative with the top of a pie, check out my tutorial on How to Make a Lattice Pie Crust.
## What if my Pie Dough is Too Hard?
##### Refrigerating the pie dough for longer than an hour will cause it to firm up since it is butter-based. Let it rest at room temperature for 10-20 minutes or until it is easy to roll out with a rolling pin.
##### If the dough is tough or dense after baking, it is usually due to overmixing, which develops too much gluten, making it chewy instead of tender.
## Make Ahead Pie Crust
- ##### **Refrigerate pie dough** up to 3 days ahead. Allow it to soften slightly at room temperature before rolling it out.
- ##### **To freeze pie dough:** wrap and seal airtight then freeze up to 3 months. Thaw completely in the refrigerator prior to rolling.
## How to Pre-bake Pie Crust (Blindbake)
##### Some recipes, such as Pumpkin Pie or Quiche Lorraine, call for a pre-baked pie crust, and this is how you blind bake:
- ##### Form your edge. The easiest methods are crimping the rim by pushing all around the edge with a fork, or forming a fluted rim (see tutorial below). Place pie crust in the freezer 30 minutes which will help the crust bake more evenly without sliding down.
- ##### Line the center with a 9-10″ ring of parchment paper and fill about 2/3 full with pie weights (\*see below). Preheat oven to 425˚F and bake for 17 minutes until golden at the edges. Remove pie weights, prick the bottom of the crust all over with a fork and place back in the oven without weights for 5 minutes or until golden and the bottom is dried out. Remove beans and let crust cool to room temperature.
## What Can I Use Instead of Pie Weights?
##### When you pre-bake an empty crust a.k.a. “blind-bake,” the dough tends to puff up and rise. Using pie weights solves this problem. Here are some alternatives to store-bought pie weights.
- ##### **Dry Raw Beans** – beans should not be used for cooking following a blind bake but can be re-used to blind bake pie crust.
- ##### **Dry Raw Rice** – If using rice, it becomes toasted and can be used for cooking in pilaf recipes after it is use to prebake a pie crust
# Strawberry Pie Recipes
Recipes for making strawberry pies.
# Fresh Strawberry Pie (Gemini)
This classic fresh strawberry pie is perfect for showing off ripe, seasonal berries. It features a crisp crust and a bright, glossy glaze that keeps the fruit the star of the show.

### **Fresh Strawberry Pie**
**Prep time:** 20 mins | **Cook time:** 15 mins (for crust and glaze) | **Chilling time:** 3 hours
---
### **Ingredients**
- **1 (9-inch) pie crust**, baked and cooled
- **6 cups fresh strawberries**, hulled (keep small ones whole, halve large ones)
- **1 cup granulated sugar**
- **3 tablespoons cornstarch**
- **1 cup water**
- **1 (3 oz) package strawberry-flavored gelatin** (optional, for extra color and firmness)
- **Whipped cream** for serving
---
### **Instructions**
1. **Prepare the Berries:** Place about half of your strawberries (the prettiest ones) into the pre-baked and cooled pie shell.
2. **Make the Glaze:** In a medium saucepan, combine the sugar and cornstarch. Gradually whisk in the water until smooth.
3. **Thicken:** Bring the mixture to a boil over medium heat. Cook, stirring constantly, for about 2 minutes or until the mixture is thick and clear.
4. **Add Flavor:** Remove from heat. If using strawberry gelatin, whisk it in now until dissolved. Otherwise, you can mash a few extra berries into the glaze for natural color. Let the glaze cool for about 10–15 minutes (it should be warm but not hot).
5. **Assemble:** Pour the glaze evenly over the strawberries in the pie shell, ensuring the berries are well-coated.
6. **Chill:** Refrigerate the pie for at least 3 hours, or until the glaze is completely set.
7. **Serve:** Slice and top with a generous dollop of whipped cream.
### **Variations to Try**
- **Cream Cheese Base:** Spread a layer of sweetened cream cheese on the bottom of the crust before adding the berries for a richer flavor.
- **Herb Infusion:** Add a teaspoon of finely chopped fresh basil or mint to the glaze for a sophisticated, earthy note.
- **Gluten-Free:** Use a gluten-free pastry crust or a simple pressed crust made from crushed gluten-free graham crackers and melted butter.